Camera fiters can improve the quality of your photos. But which lens filters do you need for a digital camera and when should you use them? This filter guide explains all…
Camera lens filters are a relatively cheap way to transform your DSLR, but they can intimidate new photographers. As with most camera accessories, there are plenty of tips and tricks, dos and don’ts, and some real room for confusion. Do you need an ND filter or an ND grad filter? Should you buy plastic or glass? Square or circular? In this camera filters guide, we’ll answer some of your most frequently asked questions, explain how to choose a filter for your lens and get the most out of them in all manner of shooting situations.
Which camera filters should I buy?
Back in the days of film, camera filters were essential for creating any kind of special effect. Although we now have Photoshop, conventional lens filters still have their place in the digital age. However, there are only 4 basic types of filter you need to own: a circular polariser, neutral density filter, ND grad and a protective one.
Should I buy circular lens filters or rectangular ones?
Filters come in a wide range of shapes and sizes, from circular screw-on filters to rectangular filters that sit in front of your lens. Prices vary too, from inexpensive options made by companies such as Kood, to high-end filters from Tiffen and Hasselblad, which are aimed at professional use. For most of us, the stand-out names are Hoya for screw-in filters, and Cokin and Lee for square/rectangular filters.
To keep the front of your lens protected, you can’t beat the convenience of a circular skylight or UV filter, which you can leave on your lens until you need to attach something more specialised, such as a circular polariser (see below). Rectangular filters, meanwhile, are more suitable for effects – graduated tints, for example, where the effect needs to be positioned accurately in the frame.
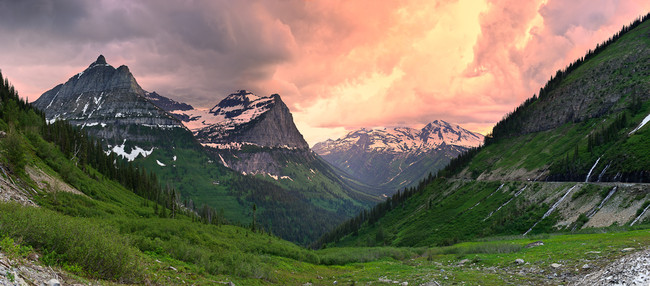
Polarising filter: before and after
What is a polarising filter?
A polarising filter boasts two main effects: depending on the angle of the sun to the filter, it can be used to intensify and add contrast to cloudy blue skies, and it can reduce reflections in glass, water or foliage. None of this can be recreated – at least not convincingly – using standard image-editing software. A polariser will also reduce the amount of light that reaches your camera’s sensor, so it's useful if you’re trying to achieve long exposures in bright light.
Polarising filters are expensive - if your camera bag catches fire, this is the first filter you'll want to save. But they're an indispensable tool for any photographer who loves shooting landscapes. However, the problem with using these filters with very wideangle lenses that landscape photographers typically use, is that the effect is quite direction specific. So. one large expanse of sky captured by a very wideangle lens will tend to be much more heavily polarised than other areas, making for an uneven filter effect.
 |
Hard-Edge Graduated
|
 |
Reverse Graduated
|
 |
Soft-Edge Graduated
|
 |
Stacking reverse GND filters is sometimes necessary in high-contrast and other rare situations.
|
ND grads are available in a range of strengths and hard or soft graduations
What is a Graduated Neutral Density filter (ND Grad)?
One of the most popular uses of square or rectangular filters is for landscape photography around dawn and dusk, when the sky is very much brighter than the land. A graduated Neutral Density filter (ND Grad) is grey at the top, blending to clear at the bottom, so it can make the overall lighting in a scene of this type more even. Without a filter, the foreground would be too dark, or the sky would appear washed out.
The advantage of using a rectangular filter, rather than a circular screw-in filter, is that you can slide the filter up and down to best match its position to the horizon in the scene. However, the amount of darkening you need depends on the brightness of the sky, so various different strengths are available. For example, Cokin sells Gradual Grey ND2, ND4 and ND8 filters, which have increasing strengths. ND Grads are also available with either a hard or soft transition between the clear and dark glass.
Before fitting a filter, a good way to judge which strength you need is to use your camera to take separate light readings of the foreground and sky independently, work out how many stops difference there is between the two, then fit the corresponding filter. Graduated tints with colour, rather than grey, can also be useful for increasing the orange hue of sunset, or for turning grey skies blue, although these colour adjustments can be made with more control during the image processing stage.
Find out how to
fake an ND grad filter in Photoshop
What is a solid Neutral Density filter (ND)?
In gloomy conditions it’s easy to increase your camera’s ISO (light sensitivity) to enable faster shutter speeds for pin-sharp shots. But what if conditions are very bright and you want to use a slow shutter speed for motion blur, or you want to use a large aperture to reduce the depth of field and throw the background out of focus in portraiture? Fit a Neutral Density filter! ND filters come in a range of densities, each reducing the amount of light that hits the camera sensor by a specified number of stops.
Solid neutral density filters, or solid NDs, have become increasingly popular in recent years, as the popularity of long exposure
minimalist landscape photography has grown. 10-stop ND filters from the likes of Lee and B+W, when combined with small apertures and low ISO settings, enable you to achieve exposure times that can run into minutes, even in bright sunlight in the middle of the day. Extreme ND filters like these are perfect for making moving water appear glass-smooth, or for shooting architectural scenes with moving people blurred out.
UV / haze/ skylight/ clear filters
What is a skylight filter?
Some photographers choose to leave a clear filter permanently attached to the end of their lens, whether they’re shooting outdoors in any weather conditions, or indoors under ambient lighting, or using a flashgun or studio flash. This is not so much for any optical benefits it may provide, but more for reducing the risk of accidental scrapes. After all, it’s much cheaper to replace a filter than the front element of your lens.
Historically, the two most popular choices for screw-in filters that can be left on pretty much all of the time are the Skylight 1B and the UV Haze. A particular advantage of the Skylight 1B is that it reduces the bluish tinge often associated with shooting outdoors, particularly in shady areas under a big blue sky. However, with the ability to automatically or manually adjust white balance settings in digital photography, this isn’t really a problem. So a UV filter is a better option because the absorption of ultra-violet rays has the additional bonus of reducing haziness in outdoor photography.
Filter tip: remove a UV filter when you’re taking long exposures at night. This is because any attached filter can create ghost images of bright lights, such as street lamps or the moon. Fit a lens hood for protection instead.
Buy a square ND grad filter rather than a circular one – you'll then be able to adjust the depth of the effect
How does a ‘square’ filter kit work?
Unlike screw-in filters, which fit directly to the front of your lens, square or rectangular filters rely on a slightly more complicated arrangement. The first part to fit is the adaptor ring, which screws into the filter thread of the lens in the same way as a screw-in filter. In this case, however, a filter holder slides onto the adaptor ring, and this holder can then accept one or more square or rectangular filters simultaneously.
One advantage of this arrangement is that, if you have various lenses that all have different-sized filter threads, you only need to buy relatively cheap adaptor rings in the various sizes, rather than duplicating the actual filters, which would be much more expensive. Another bonus is that, even though most filters from the likes of Cokin and Lee are square, you can also buy round, rotation specific filters like circular polarisers, which fit into the same holder, making the system even more versatile.
Camera fiters can improve the quality of your photos. But which lens filters do you need for a digital camera and when should you use them? This filter guide explains all…
Camera lens filters are a relatively cheap way to transform your DSLR, but they can intimidate new photographers. As with most camera accessories, there are plenty of tips and tricks, dos and don’ts, and some real room for confusion. Do you need an ND filter or an ND grad filter? Should you buy plastic or glass? Square or circular? In this camera filters guide, we’ll answer some of your most frequently asked questions, explain how to choose a filter for your lens and get the most out of them in all manner of shooting situations.
Buy camera filters to fit your lens with the largest filter thread
What size lens filter should I buy?
For screw-in filters you simply need to match the filter to the thread size of the lens you are using, which is generally printed on the end of the lens barrel. When looking to buy screw-in creative filters that you want to use on different lenses, buy those that are a direct fit for whichever lens has the largest screw thread. You can then use a set of step-up, or stepping, rings to attach the filters to the rest of your lenses. For example, a 55-58mm step-up ring would enable you to attach a 58mm screw-in filter to a lens that has a smaller 55mm screw thread.
For square or rectangular filters, it’s more complicated. Cokin filters, for example, come in a range of different sizes and ‘series’, including A, P, Z-Pro and X-Pro. The A-series system will mount on lenses with a thread size of up to 62mm, but is only suitable for modest wide-angle use down to an effective focal length of 35mm. This makes A-series filters unsuitable for most DSLRs with kit lenses, where the 18mm wideangle setting is equivalent to about 28mm.
The P-series mounting kit and filters are a better bet, because these provide better wideangle coverage (28mm), and can be mounted on lenses with a thread of up to 82mm. For ultra-wide photography or for lenses with a large front element, Cokin’s Z-Pro series takes you down to an effective focal length of 20mm and a thread size of 96mm, while the X-Pro system goes even further, making it suitable for effective focal lengths as wide as 15mm and filter thread sizes of up to 118mm.
Are glass filters better than plastic ones?
Not necessarily. Manufacturers often use a range of different materials, depending on the type of filter they produce. Resin, for example, is often used to make graduated ND filters and tinted filters because it’s tough, lightweight and offers very good optical performance. For thin filters, often used for colour correction or softfocus effects, polyester is the norm, while other filters such as polarisers and some special effects filters need to be made from glass. Even then, all glass isn’t created equal, and more up-market filters will typically be made from higher grade glass, such as Cokin’s CR39 Organic Glass. This is tough, lightweight and has excellent optical properties, making it equally popular for use in prescription spectacles.
Ghosting: bright lights can give rise to unwanted reflections being generated inside the lens
Do I need to buy multi-coated filters?
Look through any window or sheet of glass and you’ll see reflections. In an uncoated filter, this means that not all of the light reaching the filter is passing through it – some of it is reflected. One disadvantage of reflections is that they cut down on the amount of light reaching the sensor, but a bigger problem is that some reflections will be bounced into the lens, where they can cause ghosting and flare, and a loss of contrast in the resulting image. Good quality filters therefore use multiple coatings that are designed to cut down on reflections and ensure the greatest possible transmission of light.
Are ‘professional’ filters worth the extra expense?
Up-market screw-in filters, such as Hoya Pro-1 Digital, often feature upgrades to reduce unwanted reflections to the absolute minimum. This is important in digital photography because digital sensors are more prone to the effects of ghosting and flare than film. This class of filter typically employs advanced ‘digital multi-coating’, matte black frames and even black-rimmed glass to avoid any light being bounced around. The frame of the filter often also has a low profile (see below) and, in the very finest filters, the frame is sometimes made of brass rather than aluminium, because there’s less chance of it binding to the filter thread of the lens, which can occasionally require the use of a filter wrench for removal. In short, the best quality lenses deserve the best quality filters.
When should I use ultra-thin filters?
There’s not normally a problem using standard thickness screw-in filters, instead of a more expensive filter with an ultra-thin profile. The main exception is when you’re using an ultra-wideangle lens because, in this case, the protrusion of the filter frame from the front of the lens can block out light from the corners of the image frame. This darkening of corners is called vignetting, and will be most noticeable when using your lens’s largest available aperture.
Adjust the position of a polariser before you fit a lens hood
Can I still fit a lens hood when I’m using a filter?
Strong light striking a filter at an oblique angle is likely to cause ghosting and flare, in much the same way as light striking the front element of your lens, so it’s still a good idea to use a lens hood if you can. However, this can be a pain when using directionally sensitive screw-in filters like circular polarisers in conjunction with petal-shaped lens hoods that twist onto the lens barrel, because you have to remove the hood to adjust the filter. In this case, it's best to shield the filter with your hand. A bellows hood is a popular type of lens hood for square and rectangular filter systems. It can be easily mounted in front of the filter system and extended or contracted to suit the focal length of lens being used.
Can I use multiple screw-in filters at the same time?
It’s great being able to mix and match filters to get different creative effects, but there’s a catch. The simultaneous use of multiple screw-in filters greatly increases their ‘profile’ – the distance they protrude from the front of the lens – which often causes vignetting. Square or rectangular filters are better suited to multi-filter use, as the filter holders that attach to the front of the lens don’t encroach on the corners of the image, and can typically accommodate two or three separate filters with ease.
Will using a filter affect my camera’s metering?
Different filters, and especially circular polarisers and colour filters, can dramatically reduce the amount of light that enters the lens, and this will have a profound effect on the exposure setting. The good news is that your camera’s internal light-metering system, which measures light ‘through the lens’ (TTL), should automatically correct for filters in the vast majority of cases. However, a little fine-tuning is often needed, so it’s best to review images using your SLR’s histogram, dial-in any exposure compensation that’s required, and then re-shoot the subject.
Shooting in colour and converting to black and white later gives you flexibility
Do coloured filters work for black and white photography?
Film photographers often use yellow, orange or red filters over their lens when shooting with black and white film to make cloudy skies look increasingly more dramatic, or they might use a green filter for enlivening skin tones, especially under tungsten lighting. These filters have the same effects in digital photography if you set your camera to its black and white image capture setting and use the appropriate manual White Balance setting to match the lighting conditions. However, most of us prefer to shoot in regular colour mode and then adjust the amount and the colour of ‘filtering’ afterwards, when converting the image to black and white using editing software such as Photoshop Elements.
What is a rear-mounting filter?
It’s not practical to use screw-in filters with some lenses. For example, the diameter of the front element of some super-telephoto lenses is too large, so a slot-in filter holder near the back of the lens neatly enables the fitment of a much smaller colour or polarising filter. Similarly, it would be impossible to fit a front-mounting filter to a fish-eye lens without obscuring the corners of the frame, so some of these have a gel filter slot in the rear of the lens, just behind the rear element, into which you can insert small squares of coloured gel filter material, before fitting the lens to the camera.
'Macro' filters offer an affordable route into close-up photography
What is a close-up filter and when would I use one?
Also called ‘macro’ filters, close-up filters have the effect of magnifying the image seen through the lens – a bit like looking at insects, details of flowers, stamps and other small objects under a magnifying glass. Different amounts of magnification are available and, overall, the use of a close-up filter is very much less expensive than buying a specialist macro lens – typically around £25 as opposed to hundreds of pounds. Unsurprisingly, however, the image quality is rather inferior compared with a good macro lens, so the latter is better if you can afford it.
Use light balancing gel filters on flashguns to balance the light
What are ‘light balancing’ filters used for?
These filters used to be very popular in film photography, as you could make adjustments for the temperature of ambient light, often warming it slightly for more flattering portraits or, in more extreme cases, for using daylight film under tungsten lighting, or vice versa. With adjustable white balance options in digital cameras, they’re no longer necessary, but you can use coloured filter materials with flashguns, which have a daylight colour temperature. This is particularly useful when you want to balance the light from a flashgun with ambient tungsten or fluorescent lighting. Under regular room lighting, set your camera’s White Balance to Tungsten and use a yellow filter over your flash. For fluorescent light, set your White Balance accordingly and use a green filter. Better still, use a gold or green Sto-Fen Omni Bounce diffuser as necessary.
 |
| By: Werner Kunz (werkunz1) |
Compose and focus before you fit an infrared filter
When should I use an infrared filter?
Seeing the world in infrared opens up a whole spectrum of fascinating photographic potential for the creative photographer. It's easy to become seduced by the unusual tones, intense hues and mesmerising colours that can be achieved through infrared (IR) capture.
If you want to experiment with infrared photography without the expense of converting an old DSLR to a dedicated IR camera, try starting with an infrared filter such as the Hoya infrared (72R). At around £50 (the price depends on the size of screw thread) it’s a much more economical alternative and you’ll be able to achieve some amazing results.
The filter essentially blocks all visible light, only allowing infrared light to pass through the lens to your sensor. It’s simply a case of screwing the filter to your lens and shooting away. It’s worth noting, however, that different cameras will have a varying sensitivity to infrared light and so some will be more successful than others for IR photography. There are some downsides to using a filter, which might become too frustrating if you’re bitten by the IR bug. As the filter blocks out nearly all visible light, you won’t be able to see anything through the viewfinder with the filter mounted, meaning you’ll need to remove it to focus and compose your shot. This also means you’ll need long exposure times, often of several seconds, which obviously necessitates the use of a tripod.


.jpg)

.jpg)
.jpg)

.jpg)
.jpg)


